Best Launch Options Commands for CS:GO and How to Set them
CS:GO has been popular for as long as it has because it’s a hugely competitive game. While there’s no way to gain an advantage in the basic gameplay, other than practicing more than your opponents, there are certain settings or options that will give you an edge over players using different options or settings. In this guide, we’ll be covering exactly what CS:GO launch options are, covering all the ways you can launch the game and why you might want to do it one way over another.
Where are CS:GO Launch Options?

Given that they’re called ‘launch options,’ you’d be right in guessing that we’re talking about options you can change yourself in the game. You’ll find them in the game’s Settings Menu. Unless you know what you’re looking for though, you’re going to have a hard time getting the most out of them.
These options affect several aspects of the game, and there are a few that are better for certain features than others. That’s why we’re going to cover all the settings you could have in this guide.
Useful Launch Options for CS:GO

Despite what players in the community might tell you, there isn’t a ‘best launch options’ for everyone. What’s best for one player might not be the same for another player. This could be due to hardware limitations, or even the physical limitations of a player themselves.
What we have here are some of the best CS:GO launch settings. We’re going to give you the exact details of them all and explain what each part means too.
Great Launch Options for Most Players
-tickrate 128 +fps_max 0 -novid -nojoy
If you have no idea what you want to get out of your launch settings, then this is a good place to start. These settings are great for most players, and they’ll give you an idea of how you can tweak the game to be better in some areas that might benefit you in the heat of battle. To understand them, let’s break them down.
-tickrate 128
This setting is for the tickrate of all bots in offline mode or any games you host as your client is up to 128 instead of 64.
+fps_max 0
This launch option is also a console command. What it does, is remove the cap on frames per second that is set by the game by default. Most players choose to turn this off, but new players won’t be aware of it. This is essential if you want to keep up with competitors.
-novid
This is a handy setting that eliminates the Valve video that plays every time you load the game up. The video is unnecessarily long, and this will let you get into the game quicker.
-nojoy
This setting removes joystick support from the game. If you’re using a controller, do not use this part of these settings. The reason it’s in here is that most players prefer mouse and keyboard. By removing the joystick support, you’re freeing up what could amount to a lot of RAM that would otherwise be unavailable to you. It’s highly unlikely that you’d be using a joystick, so this is a great way to boost performance.
-high
This isn’t in the full chain of launch options above because it has been known to cause issues with computers. Use it at your own risk. It tells your computer that CS:GO is a higher priority than anything else, meaning that your hardware will dedicate more processing power to it.
While this is guaranteed to boost performance, it’s a risky move. Try it out for a match or two first. If you notice issues, get rid of it. However, if you don’t, leave it as it is and enjoy a better version of the game.
Improved FPS Launch Options
The following launch options are built to prioritize frames per second (FPS).
+fps_max 0 -nojoy -high -fullscreen +mat_disable_fancy_blending 1 +cl_forcepreload 1 -limitvsconst -forcenovsync +r_dynamic 0
This first one will maximize your frames but comes with a warning. It actually does a lot that might hinder your game. For example, Dynamic Lighting has been disabled. This could cause your weapon shots to sound but fail to show a visual action. If you’re playing with the sound off, this could totally ruin your game.
+mat_queue_mode 2 -disable_d3d9ex -r_emulate_g -softparticlesdefaultoff
Unfortunately, these settings could raise or lower your FPS based on what hardware you have. They’re good for trying out and seeing what is possible. Ultimately though, both settings put your game at risk, and you might not bother with them because of it.
We’ll break all of these down below so that you understand the settings involved. However, we’ll leave out the ones that we’ve already covered above. As with all of these settings, you can individually tweak them based on your hardware if you’d like.
-fullscreen
This setting will change the game to start up in fullscreen mode. It’s a setting that most players enable anyway, but you might not have if you’re just getting into it. The advantage of fullscreen mode is that more of your computer’s resources are dedicated to the game. Your computer will still be working on other processes in the background while you play in windowed mode, costing you performance and frames.
+mat_disable_fancy_blending 1
This is actually a console command. You can open the Developer Console with the ‘ `’ key and put it in there to activate it if you want. Make sure you don’t paste in the ‘+’ though, since this wo’n’t work in the Developer Console. The setting disables ‘fancy blending,’ which can affect your FPS. However, with it off, textures may look low quality, so be ready to see an uglier version of the game.
+cl_forcepreload 1
This is another setting that you could use as a console command. It forces the game to preload a lot of content while loading the map. For example, models and sounds. While maps will take longer to load, you’ll have better FPS, and far less stuttering in the game once you’re playing. This is an option that you might want to leave if you don’t have the RAM to back it up.
-limitvsconst
With this setting, you’re limiting the number of vertex shaders on show to 256. This could increase your FPS, but it’s hard to say without knowing what hardware you have.
-forcenovsync
You can use this setting to disable VSync. Most of the time, this setting causes problems instead of helping to solve them. In fact, that’s why most players disable it in their game. Again though, you might not have yet if you’re new. Removing VSync can cause screen tearing. If you see that, then turn the setting back on immediately to fix the game.
+r_dynamic 0
This is the setting we warned you about earlier. It’s used to disable Dynamic Lighting and can cause your weapon to fire without a visual response. However, it will provide you with boosted FPS. The choice as to whether to use it is yours.
+mat_queue_mode 2
With this setting, you’re changing the queue/thread for the game’s material system, telling it to be an asynchronous queued mode. You may see a boost to FPS with this setting, but it’s just as likely to lower your FPS. It’s recommended that you test it out by yourself before turning it on for a competitive game.
-disable_d3d9ex
As you might be able to tell, this setting disables DirectX 9Ex, but it will hit your FPS with a decrease. If you don’t need a performance boost, leave this setting as it is by default.
-r_emulate_g
This setting forces CS:GO to emulate OpenGL. Valve claim that this boosts FPS, but it’s not known why.
-softparticlesdefaultoff
The final setting for this section makes the game render particles without any feathering. This is a process that blends the particles for the depth of the scene. It’s going to decrease the quality of the game’s visuals, but it will almost certainly give you a boost to frames.
CS:GO Launch Options for 144hz
There’s only one launch option that you should be using if you have a monitor that’s capable of 144 refreshes per second.
-refresh 144
Whether or not you need to be using this launch option/command is up for debate. Some players in the community believe that the game should automatically pick up the monitor you’re using and adjust the settings accordingly. However, by using this yourself, you ensure that you’re telling the game to work with your monitor to the best possible degree.
If you have a 144hz monitor but you’re not getting 144 refreshes per second, you may need to change your Windows settings. This should also set CS:GO up to launch with this setting already enabled.
Windows 7 and 8 144hz Setup
- On your desktop, right-click and select the “Screen Resolution” option.
- Now select the monitor that you want to change settings for. This should be your 144hz monitor. Now you need to click on “Advanced Settings.”
- Select the tab labeled “Monitor” and set the refresh rate to 144hz. Click “apply,” and the settings should be changed.
Windows 10 144hz Setup
- In the start bar, search for the term “display settings.” you should see an option for “Change Display Settings.” Click it.
- Click the “Advanced Display Settings” option on the window that opens.
- Now click on the “Display Adaptor Settings for…” button and select your 144hz monitor.
- Click on the “Monitor” tab and then set your “Screen Refresh Rate” to 144hz. Click the “Apply” button, and the changes should be saved.
Autoexec Launch Options
These launch settings work with an autoexec file. The file is simply a collection of commands that will all be applied as the game launches. Some pros use this launch setting to enable everything they need. It avoids them having to manually add all of the commands to the Developer Console once they’re in the game.
+exec autoexec.cfg
It’s important that you set the autoexec file up before using this setting. Otherwise, it won’t benefit you at all.
Every CS:GO Launch Option
Since you might want to create your own launch settings, we’ve included a list of all the known ones that can be used in the game. You can add all of these into your settings to apply them to the game. Please note that everything within square brackets should be replaced with a number.
- -refresh [refresh rate] – Sets the refresh rate of your client.
- -tickrate [tick rate] – Sets the tick rate of any server or single player game.
- -fullscreen – Stars CS:GO in fullscreen mode.
- -windowed – Starts CS:GO in windowed mode.
- -noborder – Removes the border from around CS:GO while playing in windowed mode.
- -d3d9ex – Disables DirectX 9Ex.
- +exec [file name] – Executes commands in a specific file that you define. Replace ‘[file name]’ with the name of the file that you wish to use and its file path.
- -disable_d3d9ex – Disables DirectX 9Ex.
- +mat_disable_fancy_blending 1 – Disables fancy blending on textures in the game.
- +cl_forcepreload 1 – Forces game to preload models while loading the map.
- -high – Forces your computer to run CS:GO as a high priority over other programs that will be running in the background.
- -r_emulate_g – Makes CS:GO emulate OpenGL.
- -softparticlesdefaultoff – Makes the game render particles with no feathering.
- +fps_max [amount] – Sets the maximum FPS (frames per second) that your game will run at.
- -no-browser – Launches the game without the Panorama UI. It should disable in-game welcome messages.
- -nopreload – Forces the game to not preload models. This should result in a general game performance boost.
- -nohltv – Switches off all Source TV features.
- -console – Starts CS:Go with the console opened.
- -novid – Skips the Valve/CS:GO opening videos that can take up precious seconds.
- -nojoy – Switches off all joystick support for CS:GO, boosting performance.
- -limitvsconst – Limits hardware vertex shader constants to 256.
- -forcenovsync – Makes CS:GO play without VSync. This feature can produce a lot of lag in-game, so it’s better to play with it off. Watch out for screen tearing though.
- -threads [amount] – Allows you to set the number of processor threads that CS:GO is using. This can boost performance, but it can also seriously harm your computer.
- +violence_hblood 0 – Removes blood from the game. With less content to render, the game should run smoother and better.
- -language [language name] – Sets the starting language that CS:GO opens with. You can set this to whatever you want to make your life easier.
- -width [width] – This sets the width of the CS:GO game window.
- -height [height] – Here you can set the height of the CS:GO game window.
- -x [position horizontally] – Set the position of the CS:GO game window by your monitor’s X axis with this setting.
- -y [position horizontally] – You can set the position of the CS:GO game window by your monitor’s Y axis with this setting.
- +r_dynamic [0 / 1] – Used to disable or enable dynamic lighting. This has an effect on the game that you’ll notice, but will definitely make it run smoother.
- -autoconfig – Forces the game to start with its default settings. These are the settings used when the game is first installed.
How Do I Add Launch Options to CS:GO?
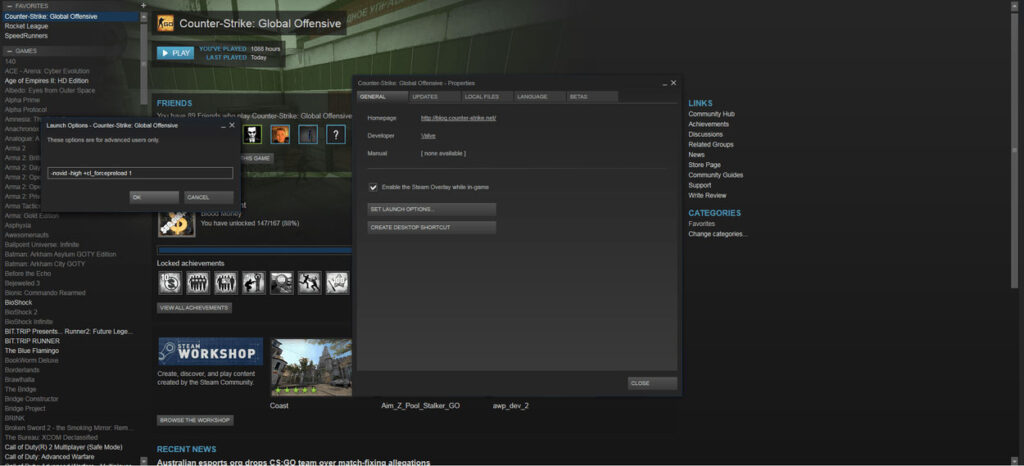
It’s very easy to add launch options to CS:GO. In fact, you can do it straight from Steam. The first thing you need to do is find CS:GO in your Steam library. Right-click on the game and click on the “Properties” option that appears.
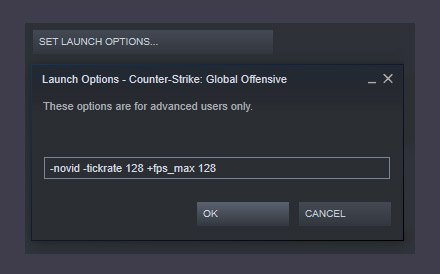
This will open a brand new window. The button that you want to click on is called “Set Launch Options…” and it will allow you to set the launch options as we’ve outlined above.
You’ll be able to type in all of the launch options that you want in the text box that appears. You can copy and paste any of the options listed in this article and use them for yourself.
Please not the following tips for adding commands manually.
- Separate all launch options with a space between them.
- Be sure to remove any quote marks (“) around the settings. Also, remove any odd characters that might not have pasted correctly.
- Check that most of your launch options have a ‘-‘ or ‘+’ before them. If they don’t, it could go on to cause issues in your game.
Make sure that you restart Steam and CS:GO once you’ve added these options. They won’t take effect if you don’t.
How Do I Reset my CS:GO Launch Options?

Resetting your launch options is extremely straightforward. All you have to do is go through the same process we’ve outlined above until you see the text box with your launch options in.
To remove all of your launch options, delete everything inside the text box. This will set the game’s launch options back to their default state. It will be as if the game is starting after a fresh install.
Alternatively, you could remove some parts of the settings you don’t want to have and leave the others. In this way, you can completely customize your CS:GO experience.
Finally, make sure that you restart Steam and CS:GO once you’ve altered your launch settings. Otherwise, the settings that you wanted to remove or change will still be applied to the game.
Conclusion
Changing your CS:GO launch settings is as easy as adding text to a box in Steam. There’s nothing complicated about it. However, you should be careful to make sure that all the settings you’re adding work with your hardware. If they don’t, then you might be causing issues on your computer that will render the game impossible to play. Stick to your hardware’s limitations, and you should have an amazing time playing with whatever options you use.
Why not try out these settings by using them to see how good you can make your CS:GO skins look?

